Cowboy Reloading with Hornady’s Lock-n-Load AP Press
By: Jesse Edward
 If you have been reloading with a single-stage press, you will find that usage of the Lock-N-Load AP will improve your reloading time significantly. You might ask, “Why is that necessary.” The answer depends on how you value your time. Being able to load 200+ cartridges in an hour is valuable to me.
The Lock-N-Load AP is a multi-stage press that can accommodate up to five operations simultaneously. Your usage of the five will depend upon what you are loading and additional accessories you may want to take advantage of. Additionally, the “AP” nomenclature refers to the “Automatic Progressive” feature of automatically indexing (turning) the shell plate to the next stage at the end of each pull of the handle. This “indexing” feature provides two benefits that I like: I can insert the next case without having to manually index the shell plate, and the odds of doubly charging a case are significantly reduced. I also installed the optional “Powder Cop” that indicates powder level after the powder is dispensed, and before the bullet is inserted. This gives an additional measure of safety.
Another useful feature of the Lock-N-Load is its Die Bushing usage. This allows you to remove and reinstall a die from the press without changing its setting. This is most valuable, for example, when you decide to load a different cartridge size, merely remove the installed die set and install the new set. The Lock-N-Load comes with enough bushings for one die set, so you will need to purchase additional ones for other die usage. Bushings are required for installing dies in the press, unlike some other presses that the dies screw into.
Installation of the Lock-N-Load AP was simply a matter of following the directions for the most part. It took me about four hours from start to finish. Some of this time was due to not thoroughly reading the instructions and then having to back up and follow directions! This was my first reloading press so I was very excited to load my cowboy action ammunition on my own press.
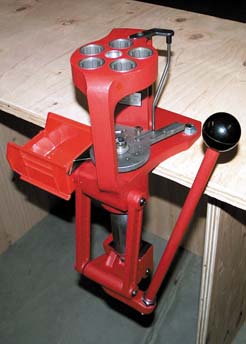
The first task was to mount the press on my bench. This press is loaded from the left side, and so I mounted it on the right side of the bench (Figure 1). This is contrary to the picture shown in the manual that shows it mounted on the left side.
Once the press is mounted, it’s time to insert the proper size primer slide, shell plate for the selected cartridge size, and the various dies, and then to make adjustments. I first laid them all out on the bench to make sure I had everything and that I knew what each was (Figure 2).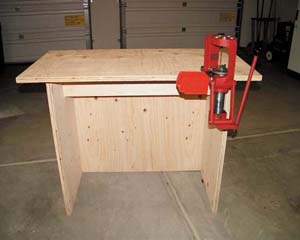
My primary usage to date has been to load .45LC. I use all five stages for this load. The primer is removed and the shell casing is sized within the sizing die at stage 1. An expander die is used at stage 2 that bells the mouth of the case out slightly to allow placement of the bullet. A powder measure is installed on stage 3 that has been adjusted to the correct amount of powder for your load and drops into the case. Stage 4 has the Powder Cop. The bullet is seated to the proper depth using a bullet-seating die at stage 5, which also crimps the casing so that the bullet will not push in or come out under recoil. Note that the new primer is inserted in between stage 1 and 2 when the handle is raised to its up-most position.
The first die I installed was the sizing die, which also removes the old primer. This was followed by the expander die, which puts a slight “bell” or flare on the case mouth. I set it for a very slight flare to where a bullet could be positioned and not fall off. To initially set the seating die, I placed a known loaded cartridge in the seating position (Figure 3) and raised the ram to its full height and adjusted the die until it was firm against the cartridge. I then took an empty case and sized it (removing the old primer), skipped the primer insertion, expanded it, and then cycled it to the seating position, placed a bullet on it, and seated it. I checked the bullet position in the case and adjusted the die until the seating was comparable to the known loaded cartridge. I then set the seating die to also crimp the case. This took me about a half dozen cartridges to get right (note: I was not loading primers at this time, the primer tube was empty). I then “locked” each of the dies so their settings would not inadvertently change. This is accomplished with a lock ring on the die (Figure 4) that tightens against the die bushing. The Hornady die wrench is handy for this and for removing dies with the bushing. I loaded a half dozen cartridges without any primer or powder and checked their fit and function in my .45 pistols and my .45 rifle. Everything was ok! This is an important step to take. Some firearms can be rather persnickety about cartridge sizing. This is often more true with some of the old cartridge types (e.g. .44-40, .38-40, .32-20). It’s not too useful to load a large number of cartridges and then find they won’t work in your firearm!
I was then ready to set the powder measure. I used a clean used case with the old primer still installed. I didn’t want to use a case with a live primer at this time. One thing you will need in order to properly set the powder measure is a powder scale for measuring the amount of powder being dumped so you know whether to increase or decrease the setting. This is primarily a trial and error process until you get it right. The powder measure has a micro adjustment and it takes some getting used to (Figure 5). After you gain some experience, you will be able to adjust it with fewer trials. Since the powder measure is used for all cartridges, it must be adjusted each time you make a change, unless you decide to get another powder measure for each load you use. In that case, you can remove one and install another just as fast as dies.
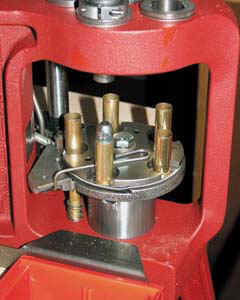 I was now ready to “load” some ammo! I loaded a small number to assure myself that the press was working correctly. Figure 6 shows the press with cases in all five positions, with the fifth being the seating and crimping stage. Figure 7 shows the Powder Cop. The pin in the center with the white band rises when the powder-loaded case is raised in the position. It is not a powder measure indication, but makes it easy to determine if no powder, the correct amount of powder, or a double load is in the cartridge. I loaded the primer tube with a 100 primers and proceeded to load up 50 rounds. I then headed to the range to verify everything worked, and it did!!!
It was then back to the loading bench to load cartridges for the next shoot. I was loading away and suddenly I noticed powder on the press. Yep, I had loaded another 50 plus cartridges and had run out of primers. Powder was being placed in cartridges with an empty primer hole. This press does not have a low primer feed sensor that some other manufacturers provide and that I had used before. Thus, I found it necessary to keep track of how many rounds I had loaded in order to know when I was getting low on primers. To do this I always start with a full load of primers (100) and an empty ammo box (100 rounds). When I get to about 95 loaded rounds, I check the last five rounds for primer insertion before powder loading. So far, that has worked just fine. I have loaded about 1500 rounds of .45 with no problems.
My second type of cartridge to load was the .32-20. I was glad that I could simply remove the .45 dies and keep their settings. The .32-20 load gave me some problems with the standard Hornady .32-20 die set. The problem was that the standard two-die set did not expand the cartridge neck sufficiently to insert a lead cast bullet, so that when seated it did not “shave” off some lead from the bullet. This was solved through the use of a .32 S&W expander die to put a slight flare in the case. The folks at Hornady technical support came up with this solution. One should always remember that the necks on bottle-necked cartridges are not as strong as straight-walled cartridges and the mouth of the case should only be expanded to allow the very base of the bullet to seat firmly, no more. The 32-20’s are loading okay now. My next cartridge to load is the 38-40 for my original 1889 Marlin.
It’s worthwhile to mention a few of the accessories that Hornady offers that I have used. The Cam-Lock bullet puller (Figure 8) works with the press to easily remove bullets. I used it to remove the bullets from the cases I had loaded in the setting up process. The Case Trimmer (Figure 9) is used to restore cases to the correct length. The Case Care Kit contains case neck brushes, a deburring tool, and primer pocket cleaning heads, along with a case lube pad and loading tray (some components shown in Figure 10). There are a number of additional accessories available to make your reloading easier and to produce higher quality results.
I can’t end this article without stressing SAFETY. Reloading can be an extremely rewarding aspect of shooting. However, just like shooting, it must be done within certain parameters to assure that it is done safely. Like shooting, you will be better off to initially work with someone that’s experienced at reloading, a mentor. There is plenty of literature about reloading as well. Hornady, for example, has books and videos.


