SHOOT! Magazine’s Guide to Getting Started
in COWBOY MOUNTED SHOOTING
Cowboy Mounted Shooter 2 Gun Dana did such a great job covering Getting Started in Cowboy Mounted Shooting in her series that was published in Shoot! Magazine, that we decided to include the four parts of the series for this section of our web site. Enjoy!
Getting Started in Cowboy Mounted Shooting Parts 1-4
“How the Turtle Wins the Race”
By: Dana Hillman, aka 2 Gun Dana
Part 1
Hello, my name is Dana Hillman, aka 2 Gun Dana in the SASS shooting world. I started shooting in 1996 with my first major match. Over the years I have built my shooting skills to a level that has enabled me to win two World Ladies Modern Titles, three World Mounted Titles, and two SASS World All Around Titles, as well as four National Titles. Thanks to the help of many wonderful cowboy action shooters, who took the time to show me shooting techniques and better ways to improve my skills, I have succeeded in this sport. Now I feel the need to reciprocate that assistance by giving back to anyone who needs my help or advice. To do this, I created a brief shooting seminar called “How the Turtle Wins the Race.”
It all started in September at my club’s annual Idaho State Championship shoot in Jackpot, Nevada . I asked Clarence Sparks, aka nobody, if I could give a free beginning shooting seminar for the ladies. He kindly allowed me to run my ideas and shooting philosophy past anyone who was willing to listen (this also included the men who showed up with their wives!!). I was quite surprised at the turnout in both male and female shooters. I was even more surprised that they liked what I had to say and wanted me to continue giving this seminar. At the end of my seminar, I gave my student certificates dubbing them members of the 2 Gun Dana Gamer Gang. I did this because of the narrow minded attitudes of some shooters who feel that being a good shooter is equivalent to being a gamer. The seminar was such a success that Chucky of Shoot! Magazine asked me to write this series in order to help both cowboy action and mounted shooters.
Like most beginning shooters, I started out in an area where cowboy action shooting was not really happening. My dad and I had no one to really show us the ropes, techniques, and bio-mechanics of the sport. I started out with 7 ½ ” Ruger Vaqueros, using factory full load .45 colt ammo, a .44-40 10 lb. Yellowboy rifle, and a double-barrel shotgun with heavy 12 gauge shot shells. I also wore chaps, spurs, vests, knives, and every accouterment that made me look like a cowboy. It only took me a couple of years (painful, of course) to figure out that for me, I was going about the whole sport wrong, and that I needed to figure out what I wanted out of the sport.
After experimenting with a variety of firearms, including several types of rifles, pistols, and shotguns, my father switched me over to modern Ruger Blackhawks with 6 ½ ” barrel. This slowed me down and taught me to aim at my targets before I fired a round (Good strategy, hit what you are aiming for!). My original rifle was too heavy, so I switched to a .357 Marlin Cowboy, for reasons explained further on. The double barrel used to beat me up. I had bruises constantly on my jaw and fingers; hence I switched to the ‘97 Winchester shotgun. This brings me to the basis of what I want to share with you. I have an outline for success as a beginning shooter. It took me 7 years to figure out what I can explain to you in a few articles.
The first point I make in my seminar is something we all have to decide in this sport. Basically you need to ask yourself “What do I want out of this sport?” Do I want to be a recreational shooter who enjoys spending time with my family, husband, or friends and am not really as concerned about winning as just participating in a sport? Do I want to be the best-dressed competitor on the range and focus all of my energies on playing a specific character or role? Do I want to be the best competitor in my class and be a consistent shooter? Whatever you decide, you need to structure your training program to this decision because it will have a major effect on the types of guns and gear you will purchase or acquire. As you all probably know, cowboy action shooting is expensive. As handguns, rifles and shotguns alone can cost hundreds of dollars each to acquire. Then you must purchase a functional leather rig for both your handguns and shotgun shells. After this, you need to purchase or make what you want to wear. In my view, the priorities in this sport are guns, followed by rigs, and then clothing. But remember I am a competitor, not a dresser.In my next article we will explore the types of handguns, rifles and shotguns I feel are best suited for a beginning competitor that will last for years and that you can grow with as a competitor. Now I would like to touch on the second half of my article concerning Mounted Shooting.
Mounted shooting is the ultimate thrill for a shooter. There is nothing like being on 1400 lbs of horseflesh and trying to shoot a gun at full breakneck speed and trying to hit moving balloon targets. Here again, you have to decide what you want out of the sport. For example, my father enjoys competing in this sport so that we can travel and participate in a sport together. He is a good competitor and has won a World Title of his own, but he realizes that there are limitations for him in this sport because of his age and health. Because of these limitations, he structures his training program around what he knows he is capable of doing and accomplishing.
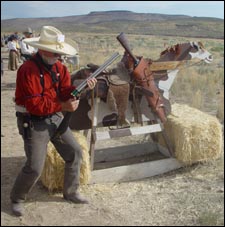
The first and most important thing that you need to have is a horse (how could you do it without one?). Not just any horse will do. Your horse has to be intelligent, gentle, healthy, and have a quiet disposition. It takes a lot of time to find this type of horse. I was lucky that I had a horse that was willing and able to do this sport with very little up-front training. He was a six-year-old ranch gelding that had been used on a cattle ranch for roping and had done a stint as a college rodeo pickup horse so he basically had seen the “elephant” so to speak. The first shooting match we went to, he won the Montana State Championship. We only improved after that. I will admit that I have been looking for a backup horse, but have yet to find the right horse to replace him. I had my eye on a horse, but $10,000 dollars for a 4-year-old ranch horse run away seemed a little silly. Here in Idaho , you can still find a pretty darn good ranch horse for two to three thousand dollars, and by the way, I only paid $2000 for my plug Jack.
After finding the appropriate horse, it is important to start training him to be a mounted shooting horse. There are several instructional videos that you can purchase to help you learn how to be a mounted shooter and to teach your horse to be a good shooting pony. One such video is by Outlaw Annie, found in most shooting chronicles. Basically, aside from general agility, conditioning, and reining, you need to work with your horse to prepare him for the mounted shooting experience. The three scariest elements of mounted shooting for horses is the gunfire, the balloons, and the breaking of the balloons. Acclimating your horse to these elements is often frustrating work, but one simple thing you can do is to put balloons everywhere. I mean everywhere, around his food and water, in the barn, and along the fence. If you can acquire construction cones (legally of course – no stealing them) it will help you even more. Place them around your horse’s paddock and put the balloons in them with simple PVC pipe or sticks with alligator clips on them. Also use a variety of balloon colors, especially white as that seems to be the color that bothers the horses the most. In no time at all, your horse will get used to the balloons or he will starve.
The next step is training your horse to gunfire. This is the tricky one. Be prepared for a wild ride and to possibly dropping your gun in the dirt. I have yet to try this, but I have considered playing an audiotape with gunfire on it continuously for the horse to listen to. This may help him get used to the noise. What I did, and you can too, was buy a child’s toy cap gun – inexpensive with an unlimited supply of caps. Don’t laugh, it works. It makes the same type of popping noise, albeit not as loud, as a gun and looks just like a real gun (remember, horses have eyes in the back of their heads and great peripheral vision). You can also use an air gun with BBs in it. When you start shooting off of your horse, you want to make sure that you are shooting behind your horse so that he has a chance to move away from the noise. Allow him to either trot or lope, but keep him in control. Keep him along a fence line so that he cannot duck out from underneath you. Remember that you will be shooting off of both sides of your horse, so it is important to train him on both sides, not just your strong side. Keep doing this until your horse becomes used to the noise and you can gradually work your arm forward to be shooting at a 900 angle from your horse. You never want to shoot near his head if you can avoid it. It may also be useful to take a green horse to a local mounted shooting match and tie him to the fence to watch and listen to the commotion of the shoot (make sure to tie him up good and out of harms way).
When you are ready, set up a mock stage, such as the arrow pattern, with the balloons. Run your horse through the pattern (or trot) so that he can get used to seeing the balloons a few times. Then try it with your cap gun aiming at the targets. Never let your horse run away with you or get out of control. Remember your safety comes first, so drop the gun and hang on if you need to, but don’t let your horse get away without doing the pattern. If you need to, slow him down and walk or rein him in tight circles to make him do the pattern. Do this several times to get your horse used to the motions. Change the patterns around for varieties sake, and practice shooting off of both sides! Remember, there is no good reason to rush a horse that is not ready. You will ruin him to the sport of shooting. Also, remember that not every horse can or will be a mounted shooting horse. It may take time to find the right horse for your skills and ability. In my next article, I will discuss using live ammo off of your horse. This is a big step for both you and your horse to take, so be ready.
I hope that you have found this article both useful and info rmative. My next article will include the topic of gun selection for both action and mounted shooters. This is very important in either sport. For mounted shooters, I will also discuss moving to shooting live ammo off of your horse (Yee-Ha!). Remember don’t squat with your spurs on and keep a leg on both sides!
Part 2
A quick recap: the shooter needs to decide what they want out of this sport, for example being either competitive or recreational orientated. Once this decision is made, shooters can then structure their training, clothing, and firearms around what they feel they want and need out of this sport. For the mounted shooters, I discussed starting your horse out in the sport of mounted shooting. We talked about training your horse on balloons, gunfire, and starting some pattern work on horseback. This issue, I would like to continue on with a discussion on gun selection for both mounted and ground shooters. I would also like to talk to the mounted shooters about moving into live fire off of their horses.
As I said in my last article, gun selection is very important especially in the early stages of the game. Not only are guns expensive, but you do not want to be always replacing them. It is a good idea to find a gun that you are comfortable with, that fits you, and that you can continually improve with.
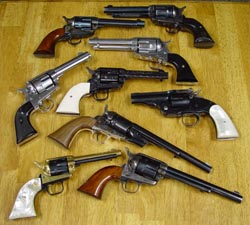
When selecting a handgun, there are several things you need to look for. These include durability, reliability, size, caliber, maintenance factors, and expense. Lets start with my story about handgun selection. I have been through about seven sets of guns for both my mounted and ground shooting. My biggest disadvantage is that I have very tiny hands. No kidding. I joke about it, but I seriously have a disadvantage, especially in mounted shooting where I have to shoot with one hand duelist style. I am only able to wrap my middle finger around the gun and I can barely reach the hammer. This was a big problem for me and really affected my gun selection.
If you are going to be a competitor in ground shooting and have small hands like me, you need to purchase handguns with a smaller caliber to reduce your recoil so that the gun does not slip in your hand as you fire it. Some great calibers for women in any shooting class are .38 long colt, .38 special, or .32 caliber guns. I shoot Ruger Blackhawks in .38 long colt caliber, and get my ammo from Blackhills Ammunition. From personal experience, I can tell you that this is a great brand of ammo that has low recoil.
After getting handguns that fit you, there are more things that you can do to them. I recommend that you use the gunfighter grips on your guns. These grips make your gun slimmer and fit a smaller hand better. I use them on both my mounted and ground guns. These are mainly made by Eagle Grips and are advertised in most SASS chronicles, and Shoot! Magazine. Action jobs on handguns are a good thing in moderation. They help smooth up the action for better cocking and make the gun easier to handle, requiring less effort to cock the hammer. But, you don’t want to get an action job that is more than you can handle (Trust me on this; been there, done that.) I also would not recommend having a light trigger performed done on your gun. This increases the risk of you misfiring or having an accidental discharge. Remember, you can always modify your gun further as your shooting skills improve.
The basic premise of my shooting philosophy is accuracy. I cannot stress how important accuracy is. This is key. It is more important that speed. Without accuracy, you cannot win a match. With this in mind, I recommend that you learn where your gun hits at a 30-foot range (this is called point of aim, or POA.) This goes for shooters in all classes. For traditional shooters, you can sight your gun in by using a sandbag and a file. Rest your hands and gun on the sandbag and fire at a target. This will give you stability for accuracy. If your fun shoots low, gradually file your front sight down until you can consistently hit the center of your target. Remember, once it is gone it is gone, so don’t take too much off of your sights. Modern shooters can do basically the same thing. You can adjust your sights as needed and even widen the rear sight notch and file down the front, if there is no elevation screw on your gun. By doing this, you will find your sight picture easier.
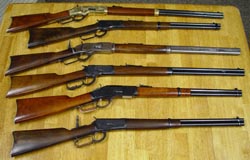
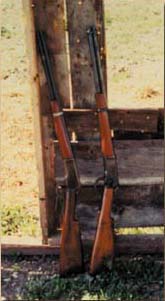
The next gun we need to talk about is the rifle. There are many varieties of rifles to choose from and it is a matter of personal taste or availability when choosing what you shoot. The most important thing in choosing a good rifle is weight, length and modifying the rifle to fit you. It is very important for you to cut the stock down to fit your arm length and shoulder. I realize that some of you may be sharing guns with other family members and this may not be possible, but try to do what you can to make it easier on you. Having a smooth action job on your rifle is also important so that you are not wasting time trying to work a sticky action. Action jobs also help in the feeding of the ammo and can speed up your shooting considerably. Having good ammo is also a key to your shooting success. I cannot count how many good shooters have lost a match (even me) because of bad ammo. The biggest problem shooters have is with reloaded ammo. Unless you are very good, ammo may not be sized right or may be too long or too short to feed properly and may not even clear the end of your rifle if there is no powder in it, a.k.a. squib loads. If you are going to use reloads, check them often and be careful with them. Finally, you are not going to believe this, but cleaning your guns can also help you win a match. Amazing but true, your guns have to be clean and in good working order to win. Also, keep all of the screws on your guns tightened and check them regularly.
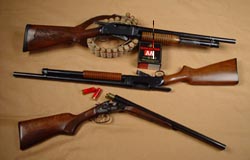
The final gun we need to talk about is the shotgun. It is your preference whether you shoot a double or the ’97 Winchester . There are definite differences between the two. We will start with the double barrel. Some of the problems with shooting a double are that when you sight down the middle the shot may slide left or right of the target. This is a problem when you need to fire at knockdown targets. They also tend to close when you pick them up, making them hard to stage to your advantage. When you have an odd number of shots, it is hard to load just one and remember which trigger to pull. Also, there is the possibility of firing both barrels at once. I did this at my first match, knocking myself to the ground to the amusement of both my father and fellow shooters. Hence, I learned to always pull the back trigger first. This eliminates the risk of pulling both barrels at once. Also, if you are going to use a double, I would recommend that you hone out the chambers so that the shells can be extracted easier. Finally, and once again, ammo is key. Using a good brand with a smooth hull, such as the Winchester AA brand, will make your life a lot easier when using the double barrel shotgun.
I prefer to shoot the ‘97 myself because it feels more like a rifle to me and I can aim better with it (remember, aiming is a good thing.) But ‘97s are not a utopia. Some of the problems with ‘97s are that they are temperamental. They can hang-up on you and if you don’t have good ammo, they don’t eject very well. Sometimes the shells don’t eject or they can flip around backwards and you waste time trying to get them out. If you don’t have good parts in the ‘97, they can slam-fire or not fire at all. Therefore, it is very important to keep up the maintenance of these guns.
The trend in shooting is moving towards knockdown targets and fliers. For this you will need some type of choke, preferably modified, in whatever shotgun you are using. You may also need to shoot heavy shotgun loads as well. Another important factor is fitting the stock of your shotgun to your shoulder so that you are not having to reach too far to load it, break it open, or to get your face down on the stock to aim (IMPORTANT!) Finally, clean, clean, clean, and tighten those screws.
In my next article, I will discuss with you the importance of gun leather to your shooting success. I will also talk about clothing and eyewear as well as practice techniques. Now I would like to devote some time to my mounted shooters.
Earlier in this article I discussed handgun selection for the ground shooters. Everything I talked about applies to the mounted shooters as well. You are limited in the fact that you must select 2 traditional, 45 caliber handguns to shoot. They do not have to be the same type of handgun. My father shoots a Ruger Vaquero and a Uberti Thunderer with a birds head grip and a 2″ barrel. It is a matter of preference. My preference runs towards Rugers. I shoot two Ruger Vaqueros with 4-1/2″ barrels, modified with Bisley hammers for my small hands, and fitted with gunfighter grips. They are virtually indestructible. Some of the problems with other brands of guns, such as a Colt or a Colt replica, is that occasionally they have fragile firing pins and the half cock mechanism in them, which doesn’t work well for me. When I tried these brands of guns, I had a tendency to misfire because of my small hands and I often short stroked with the half cock mechanism in the guns.
In my last article, I discussed at length the issue of training your horse to gunfire. When you feel that your horse is ready, you can start moving up to actual practice loads in your handguns. But before you do, there are some more issues that we need to discuss.
The first issue involves state and city ordinances concerning firing a gun within the city limits. I live in an area where you cannot fire a gun, therefore, I do not practice firing at my home. I have to travel to an arena that is located in the county to do any live fire practicing. Furthermore, you may want to alert your local police and neighbors as to what your are going to be doing if you can fire in your area or if you travel to another area. From experience, it is not fun to have to face the local SWAT team and try to explain what you are doing. It is easier to prepare them in advance.
The next issue involves the ammo that you use. Because of the safety issues involved in mounted shooting, specialized ammo is supplied for you at a match as part of your entry fee. When shooting at home, there are also many safety issues. I am not a reloading expert, so I purchase practice ammo to shoot with. There are only a few certified reloaders who can load ammo for this sport. There is a reason for this and it involves safety and bullet modification. Never take a chance on safety. Practice ammo is available at a reasonable price. Ollen Elliot out of Darby , MT can provide you with all of your ammo needs. You can also get a discount if you return the spent cases. I would recommend that you use safe ammo loaded by a certified reloader.
The final issue is not rushing yourself. If you or your horse are not ready, don’t move to the live fire stage. You don’t want to get hurt and you don’t want to backtrack on the progress that you have made on your horse so far. Just keep practicing and it will come.
When you decide to use live ammo, you may want to invest in a pair of earplugs for both yourself and your horse. This will preserve both your hearing and your horses hearing. They are easy to make if you need to. Just take an egg crate mattress cover and cut some of the triangles into individual sections. Horses do not really like to wear the earplugs so be prepared for a fight in putting them in. The horses will also shake them out, so tying them to a string on the bridle will keep them from getting lost.
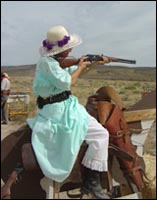
Shooting live ammo is almost identical to what we were doing in our practice sessions. It is important to remember that we only load five rounds in each gun for safety reasons. The gun will always start with the hammer resting on an empty chamber. When you start your horse in the pattern, do not cock your gun until you are at the balloon. This protects both you and your horse from accidental discharges. When you fire that first round, remember that it is going to be pretty loud and may cause your horse to jump. Keep him moving and try shooting behind him. Don’t let him duck out of the pattern or run away with you. If you need to, work him on a fence and fire to his outside so that he cannot turn out on you. And remember to work and fire off of both sides of your horse, there is no avoiding it. Also, switch your patterns up to keep it interesting for both you and your horse and to acclimate him to different shooting patterns and speeds. If you need more information on this subject, Stoney Meadows does a monthly article in the SASS Chronicle that is very informative with many useful tips.
I hope that you have found this article both useful and informative. My next article will include the topic of gun leather and clothing selection for both action and mounted shooters. This is very important in either sport. For mounted shooters, I will also discuss saddle selection as well as the importance of holstering while moving. Remember, don’t squat with your spurs on and keep a leg on both sides!!
Part 3
While I was contemplating what I wanted to discuss in this series, I realized that most of you don’t know much about me. I am 27 years old. I like to consider myself very driven and dedicated to whatever I put my mind to. By the age of 11, I held a national title in Karate for sparring. I was the youngest person in Idaho to receive a black belt in Tae Kwon Do. By the age of 22 I had a Masters Degree in Business, graduating first in my class. I was also the youngest MBA graduate ever, the school actually tried to discourage me from starting my education so soon after graduating with a Bachelors degree (I showed them.) I now currently run two family owned businesses full-time, a large dance club with a sports bar and grill, and a tanning salon.
I come from a real Western family. I would like to tell you a story about my great grandfather. In 1902, a land race was held in the Pocatello area of Idaho . My great grandfather raced a Railroad train from Lava Hot Springs to Blackfoot, Idaho, a total of 56 miles, using a string of 12 horses spaced a little over four miles apart. He came into Blackfoot neck and neck with the train in a time of two hours. One of his horses gave out on him at Blackrock canyon and he had to carry his saddle a mile to the next horse. He was also a cattle rancher in McCammon , Idaho . He survived the winter of 1919, which broke most of the ranchers in the state when hay had to be shipped in at $100.00 a ton. My grandfather, Bob Hillman, has been inducted into the Idaho Horsemen’s Hall of Fame for his contributions to horse racing in the state of Idaho , and he was an early saddle bronc rider. In the old time rodeos, everyone had to circle their cars to make the rodeo arena. My grandfather won the calf roping and the saddle bronc riding on the same horse in one rodeo.
As with any endeavor, if you want to do well in this sport, you must be prepared for some sacrifices. These sacrifices may include financial issues, time spent away from your family, time spent away from work, and even time spent on school work. When I go to a shoot, I usually have to drive through the night to get there in time for registration. I then shoot for two to three days straight, doing both ground and mounted shooting at the same event. After I finish the last stage, my father and I usually load up because we have to get back home to work. It is highly stressful and exhausting. We try to make it to six major shoots a year.
But, enough about me, lets get back to the issue at hand. In my last article, I discussed at length the issues involving gun selection. These issues included choosing firearms that fit you and modifying them to get more out of this sport. In this article, I would like to discuss choosing or creating a holster rig that will fit your needs. I also want to touch on clothing selection and eyewear, as well as some practice techniques. For the mounted shooters, leather selection for both your saddle and gun rigs is very important. I will also discuss the issue of learning how to holster while on a moving animal.
Choosing a leather rig is the next step in becoming a successful shooter in this sport. As you have probably already figured out, there are a ton of different styles, colors, and creators of leather rigs out there. When choosing a rig, there are some specific things that you need to look for. Your holsters should be able to retain your gun when you are moving or running, but should not be so tight that it hinders your drawing and holstering capabilities. I prefer one cross draw and one strong side setup because it allows me to holster faster and draw faster. But with this rig, you have to be very conscious of safety issues, specifically the cross draw shuffle. The purpose of the shuffle is to prevent you from sweeping spectators with your muzzle. Two straight up and down holsters are becoming popular because it eliminates the risk of stage procedurals or disqualifications by not doing the cross draw shuffle. These holsters can be canted forwards or backwards, depending on what the shooter feels comfortable with. Using crotch holsters, two cross draw holsters together in the front, is also somewhat popular. For them to be legal, you must be able to place your two fists together between them. These are risky for new shooters to use until they can learn to control their firearms when both drawing and holstering.
Leather rigs are not just for your guns. You need to choose a good shotgun shell belt. I prefer having a belt around my waist. Some people choose to place their shotgun shells on their gun belts in holders or slides. It is all based on preference. For me, having them higher up on my waist makes them easier for me to grab while loading my shotgun. When choosing a shotgun belt, keep in mind that it needs to be near your belly button and close enough that you don’t have to strain to reach them.
Our next issue involves choosing the appropriate clothing and eyewear. Depending on what you decide you want out of this sport, you should choose your clothing with certain factors in mind. If your goal is to be a competitor, the wrong kind of clothing can bog you down. A vest can get in the way of your gun leather and may hinder your holstering abilities. Chaps can restrict fast, fluid movement. High heeled boots are hard to run in, add spurs to them and you can trip yourself easily (been there, done that.) Knives, pouches and other accessories can get caught up on stages and add more weight for you to pack around. Scarves can fly up in your face and blind you or get caught in the actions of your guns. So here again, we ask ourselves what we want out of this sport. Are we recreational shooters that dress to the max, or are we competitors? Competitors try to dress traditionally and at the same time try to minimize clothing that restricts or binds fluid bio-mechanical movements. In most shoots, you are on rough surfaces with rocks and empty shell cases on the ground. The flatter the sole and heel of your boots, the better your balance will be in order to move quickly. When I first started, you could only do a fast walk between your transitions, so I wore the biggest and highest boots I could find. Now it is a sprint and, believe it or not, the time saved moving between guns makes up for shooting a little slower and hitting your targets.
When I first started shooting and up until a few years ago, I wore contact lenses with a pair of safety glasses over them. My eyes were constantly giving me problems. If they were not dry they were getting something in them. And if the wind blew (as it so often does when we’re shooting,) you may as well forget about actually hitting your targets. I could not see a thing. Finally, I got smart and decided to get a pair of prescription safety glasses. Now I hardly ever have problems with my eyes. I would recommend that all shooters who wear contacts consider investing in a pair of prescription safety glasses. They are well worth it.
As I sit here writing this article, it is snowing outside, and I can’t help but think about how far away spring is. It is 16 degrees outside, and the thought of going to the range to practice gives me the chills. We don’t have indoor shooting ranges in my small town. Therefore, I have devised my own system of dry fire and transitional practice at home in my living room. My goal, this year, is to utilize the space in my nightclub, which is rather large, to set up stages to practice for Winter Range in February. I will utilize typical scenarios to practice drawing, dry firing my hand guns, holstering, moving to a staged rifle, putting the rifle down, and moving to a staged shotgun, all while using dummy ammo to practice my loading techniques (the key words there being dummy ammo, remember to be safety conscious.) Hopefully, if we get a couple of warm days before February, I will try to go to the range, which may still be snow covered, to fire live ammo at steel targets. You never know about the weather here in Idaho . You can do this yourself in your garage or living room. Just remember to use dummy ammo and snap caps in your pistols and shotgun.
In my final article, I would like to summarize all that I have discussed with you and continue on with a discussion of bio-mechanics, gun staging, transitions and overall attitude for this sport. Now I will continue my discussions for the mounted shooters.
In mounted shooting, the most popular types of rigs are two cross draw crotch holsters. The purpose of the two cross draw holsters is that you have to maneuver the horse with your left hand while shooting with your right hand (for you south paws, reverse what I said.) Other types of holsters include various types of single or double pommel holsters, combination chest and shoulder holsters or straight up and down holsters. I prefer two cross draw holsters located high on my waist. These holsters were specially made for mounted shooters by Wendy Willows. They were created to hold the butts of the guns away from my body for easy drawing and holstering. They also hold my gun steady to prevent bouncing out, but do not restrict my drawing capabilities.
Mounted shooting requires similar bio-mechanics to ground shooting techniques in being able to draw and holster your handguns without losing your line of sight and control of your horse (this takes a lot of practice.) You should not holster your handgun until you have made the turn around the end of the barrel and have line of sight on your next engagement of fire. Here again, holsters that grip but don’t grab the gun, making it hard to draw, are beneficial. Always try to get around the barrel first before holstering; you would not believe how much time this will save. Also, don’t become lazy while you are searching around for your holster. Keep it moving forward. Remember, any time saved will help.
As far as saddles go, you can spend thousands of dollars on reproductions of the old classics or originals, or you can use what is comfortable for you. My dad has been riding the same saddle that his father gave to him for over 50 years ago(WOW!!) I started out using my great grandfather Baker’s original stock saddle that is about 100 years old. It killed my knees. So here again, I decided what I wanted out of this sport. I decided that I wanted to walk at the end of the day. I now use a saddle that is lighter and more comfortable for me. I have also had to lighten the weight on my horse due to his bone spurs. Having less weight to carry around (I refuse to diet,) reduces the stress on his knees.
In my final article for mounted shooters, I will discuss where you can find a good horse to buy. Also, a topic we need to cover is clothing and accessories. Remember to cowboy up and write me with any questions or comments at: 2 Gun Dana, 4010 Yellowstone, Pocatello , ID 83202
Part 4
My goal when I started this endeavor was to give beginning shooters an edge and a step in the right direction while starting in this great sport of cowboy action shooting. Now I want to give a little more advanced overview on bio-mechanics and how they can affect your shooting. I will briefly discuss how you can stage your guns for better movement and transitions. For the mounted shooters, I will talk about my clothing preferences when I shoot off of the horses and where to find a good shooting horse and what to look for when choosing said horse.
Being able to move smoothly is important when you are drawing, holstering, firing, working your transitions, and putting guns down. Putting your mind in the zone, where you block out anxiety and stress, distractions, and competitors is the key to being a successful shooter. Ground shooters must learn the fundamentals of shooting stances, drawing your handguns, breath control, mental focus, levering your rifle correctly, shooting your pistol, and running your shotgun correctly. These techniques will only come with experience at countless shooting competitions and through practice. Again, I recommend getting the best shooter at your local match to help you with the fundamentals. It is hard for me to show you these techniques on paper. You need to see how they are used to understand their benefits and how they can affect your shooting game.
An important part of shooting well is being able to multitask during the shooting scenario. This means doing more than one thing at once, like walking and chewing bubble gum – difficult for some of us, but a necessary evil. For instance, holstering one handgun while drawing the other is a great skill to practice and perfect. Levering the rifle as it comes to your shoulder shaves time. Having a shotgun shell in hand as you come to your shotgun speeds you up as well. Anything that saves time is a bio-mechanical function and a good thing to work on.
One thing I would like to touch on is shooting rhythms. These are important. It is the ability to know when you need to shoot carefully at small targets or speed up on the larger targets. For instance, consider spacing between targets. Distant targets require a slower, more deliberate shot, while a close target may allow a faster shot. Similarly, two targets spaced close together may allow for faster sighting and firing. Again, take the time to aim at and hit your targets. It is better to take a nanosecond longer to hit your target, than make a reckless shot and take a five second penalty (a painful lesson that I have learned over the years.)
Staging your guns properly is also very important. I have learned to stage my own guns at all times, making sure that they are in the right shooting sequence the stage design requires. I have also learned to position them to my advantage, such as aiming my rifle at the first rifle target. The shotgun may be turned over if it is placed next to the rifle so that empty shells are not ejected into the shotgun action (take it from someone who has had to shake shells out of her gun on the clock). Also, always, always, always check to make sure that your safety has not been engaged on your rifle. I have seen this happen so many times to people, even me.
When I say transitions, I mean moving smoothly from my handgun, to my rifle, to my shotgun, saving as many steps and motion as I can. Remember that the extra time you spend to hit your targets can be made up by moving faster between guns than your competitors. Transitions also involve grabbing your long guns correctly and positioning them on your shoulder right the first time.
Learn to snap lever your rifle as it comes to your shoulder. Have your gun levered for the next round before you come to your next target. Lean into your rifle and shotgun a little bit and practice exhaling slowly as you fire. This will help in your accuracy and your solid stance or steadiness. This is something that I learned in martial arts. By channeling your chi energy you make yourself steady. Learn good stances. I shoot with a forward stance which I learned in martial arts. In this stance, 60 percent of my weight is located on my forward knee and 40 percent is on my rear leg. This gives me an aggressive shooting stance (I also like to growl at the targets, I feel this helps me focus as well, you know, kill it, kill it, kill it!)
I bet you thought you were done with school and homework, but let me tell you, you are not. The key to being up on the game is doing your homework. This means studying the stage designs and knowing what you have to do in your mind before the shoot. Study the stages, if you can, the night before. I like to list the order of guns that I will shoot and how I will shoot them. I also include any lines or movements that are out of the ordinary that I may have to do. The trend now in competition is to have many confusing combinations of sweeps to make you get procedurals. The best way to combat this is to have good coaching. Don’t be afraid to have someone remind you on which order you have to shoot your targets or guns. My dad and I coach each other all the time. It helps calm you down on the line so that you do not become flustered and, therefore, miss what you are aiming at.
Finally, we have an attitude issue. We have all been around shooters who are uptight, stressed, or are on a power trip and think they know everything. By making you feel incompetent, they feel that they are somehow superior shooters. That is not the cowboy way. Remember, you catch more flies with sugar than you do with vinegar. Treat everyone the same way that you would want them to treat you. Have respect and patience with new shooters. Enjoy your experience in meeting the many, many, many new friends from around the world that you can make in cowboy action shooting. Also, remember that you will not do every stage perfectly. Don’t be hard on yourself. Remember, it is how you do over the long haul that will determine how you do in the shoot. Eliminate misses. Don’t shoot as fast as you can, but hit your targets as fast as you can. Stay within your envelope. As you get better, speed will come.
For my mounted shooters I would like to end on a discussion on clothing. I personally like to dress well for this event, you may even call it flashy or even quite stylish! I like to wear bib shirts that I design with embroidered dragons on them. I like to wear silver spurs and my lucky hat (my dad wishes I would find a new lucky hat, he says mine is ugly.) It is an impressive sight to see how well-dressed people can be in authentic Old West attire. You can be whatever you want to be. Just remember not to bind yourself too much or wear anything that will interfere with your mobility or ability to draw and holster your firearms.
As for finding a good horse, don’t be lured in by the golden opportunity horse. I have been there and done that. My golden opportunity horse was actually golden in color and could spin faster than a tilt-a-whirl. The first shoot I took him to, we sat in the middle of the arena in one spot and spun circles around and around and around. I almost got motion sickness from the experience. After this experience, I learned all that glitters is not gold. With this in mind, I would advise you to go out to a ranch, a feed lot, a live stock dealer, or to 4-H competitions, team roping, rodeos, or any western events to scope out prospects. If you see a good prospect, ask if he is for sale. Remember to look for a horse that is calm, sensible, sound, gentle, broken and has a good eye. I would also recommend that you buy a good broken horse for this sport. It takes too long to train young or unseasoned horses to this sport, not to mention the pain and aggravation involved (I have the bruises to attest to this.) Age is not a great factor, 14 to 15 is not really that old for a horse. My dad won his world title on a 22-year-old horse. My horse is currently 13 years old and still going strong. Find someone you can trust to give you good advice on a horse. Don’t buy a horse because he has four legs, a tail, and two ears just because you are told he is a good horse. You can buy a good horse in Idaho for $2,000.00 that will go the distance. But remember, not every horse will make a good shooting horse. I have seen too many people show up year after year with the same horse and the same ongoing battle between them. It is sometimes better to cut your losses and find a new and better horse than to perpetuate the battle.
Throughout these articles, I have given out a lot of information. Let me tell you that this is all based on my own opinions and experiences. It is in no way all inclusive and I am sure that there are many who would disagree with me. But, this is what has worked and still works for me. My final advice to you is to find the best cowboy shooter in your local club and watch him, study him, find out why he is a good shooter, and what techniques he uses. Most cowboy shooters would be more than willing to pass on good shooting techniques to you if you ask them to. There are several good shooting schools, videos, or manuals out there to help you with your goals. I will always be available to talk to you if you see me at a shoot, or you can write me at: 2 Gun Dana, 4010 Yellowstone, Pocatello, ID 83202 .
Until I see you, remember it is not how you look, it is how you shoot. Be mindful of the cowboy way. Have respect for other people. And cherish our freedoms here in the great United States of America.

 Most of those in my age bracket got their first basic education in the history and use of frontier firearms from the movies, both the wonderful old B movies as well as some great classics made by the likes of John Wayne, Randolph Scott, and even Henry Fonda. It was only as we grew older that we realized how unsafe gun handling was as presented on the silver screen and also how badly history was treated.
 In 1866, the U.S. Military introduced a new .50 caliber centerfire cartridge that represented the latest developments in self-contained metallic cartridges. By the end of the war between the states, a foregone conclusion was that muzzle loading rifles were obsolete and a hindrance on the battlefield. The progression of the development of breech loading rifles before and during the war ensured that the replacement for the 1863 Springfield rifled musket would be a breech loader using self-contained metal cartridges. Percussion breech loaders such as Sharps, Smith, and Burnside established the breech loader as a powerful and reliable weapon. Metal cartridge-firing repeating rifles, like the Henry and Spencer, further proved the viability of the breech loader, even though the fire power of these repeaters was largely deemed by the military to be a waste of ammunition. Rimfire cartridges of the day, including those as large as .56 caliber, were lethal, but lacked the stopping power needed for battle beyond short range. What was needed was a cartridge that would exceed the ballistics of the .58 caliber rifled musket, packaged into a compact metal case.
 Shooting the .50-70 Today